
Most schools will generally do a titration practical for module 6 because that is what is recommended by NESA. However, they don't have to... so be prepared!
If you have not been given a titration practical exam revise over ALL the experiments you have completed for this module in class. Revise over the hypothesis/aim, the method of the experiment and any analysis you made after the experiment. It is also possible for your teacher to challenge you with an experiment that you haven't completed in class so it would be a good idea to google typical experiments surrouding the module you are facing. Experiments are always based on formulae or calculations - go through the formulas you've been taught for this module and try connect them to possible experiments.
The rest of this blog will now guide you through how to ace your titration practical exam with ease.
How to ace your titration practical exam
First things first, primary standards!
Sometimes before you even start the titration experiment you will need to prepare your primary standard. But what is a primary standard?
- A primary standard is produced when a substance of known high purity is dissolved in a known volume of solvent.
- Features include; High Purity, Unaffected by exposure to air, Large molecular mass, Preferably solid.
- Good primary standard → sodium carbonate. Bad primary standard → NaOH.
Your primary standard can be in either your burrette or conical flask but it will be the substance of KNOWN CONCENTRATION that helps you find the other unknown concentration. For example, could be asked to dissolve 10g of sodium carbonate into water to act as your primary standard to which you would then titrate with to calculate the concentration of your titrate which could be HCL.
The following steps should be taken to make your primary standard:
- Calculate the mass of the anhydrous standard. (anhydrous means water-free, know your terminology!)
- Carefully transfer all fo the weighed mass to a clean 250ml volumetric flask using a wash bottle and a funnel.
- Fill the flask with 1/3 water and swirl to dissolve.
- Add distilled water until the bottom of the meniscus is resting on the line on the neck of the flask.
- Firmly secure the stopper in plave and invert the flask several times to ensure the solution becomes homogenous.
The titration experiment
Titration is an analytical process used to determine the moles of a substance (an analyte) present in a sample. This is known as a type of volumetric analysis.
Preparing the Titrant & Burette
The titrant is the solution to be added to the burette. The burette is washed with distilled water, followed by a small amount of titrant prior to use. The distilled water and titrant should coat all the entire interior surface of the burette and be discarded via the tip.
It is important to finish the washing process with the titrant as residual amounts of water would dilute the concentration of the titrant.
Preparing the Conical Flask
A pipette is used to transfer a specific volume to the conical flask. This specific volume is the aliquot.
The pipette is rinsed with the solution that is to be transferred.
The conical flask is to be rinsed with water prior to use. It is appropriate to use distilled water for rinsing because dilution of the solution in the conical flask will not affect the number of moles of the substance.
Add 2-3 drops of indicator to the concial flask and swirl to mix (more on choosing indicator below).
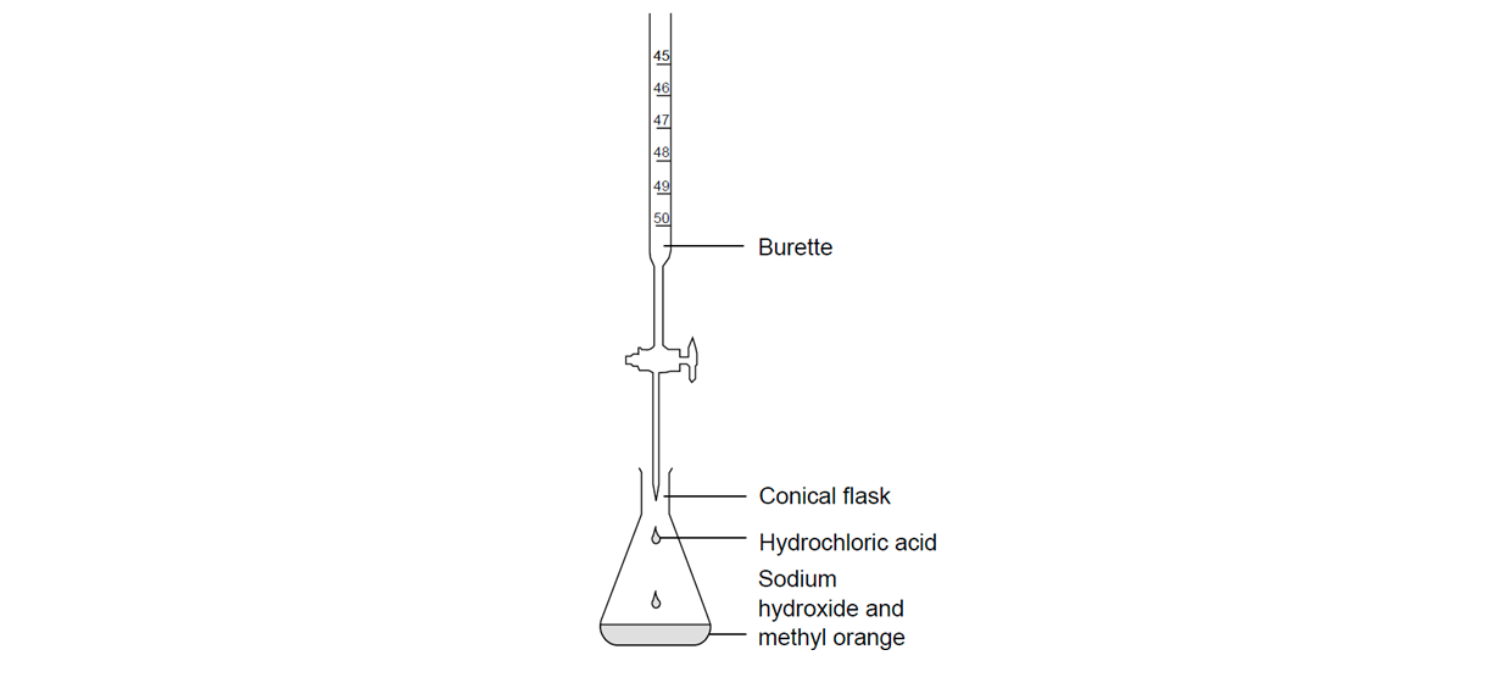
Place the concial flask such that the tip of the burrette sits just inside the neck of the flask as shown in the diagram below.
Add solution from the burette while swirling the conical flask until the endpoint is reached.
Record volume of the solution added. Repeat process until minimum three accurate titrations have been achieved.
Indicator Selection
The choice of indicator for a titration depends on the pH of the equivalence point, which in turn depends on the products of the titration reaction.
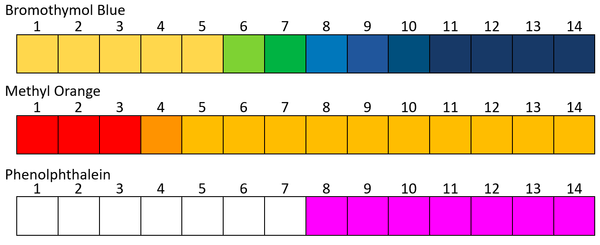
- The equivalence point is when exactly enough moles of titrant have been added to react with all of the titrant.
- The end point is when the indicator first undergoes a permanent colour change.
The colour change pH range or the endpoint must match the pH of the equivalence point.
- When a strong acid reacts with strong base, a neutral solution is formed and you should chose bromothymol blue which changes colour at pH 7.
- When strong acids react with weak bases, an acidic solution is formed - choose Methyl orange.
- Lastly, when weak acid reacts with strong base, a basic solution is formed - chose phenolpthalein as your indicator.
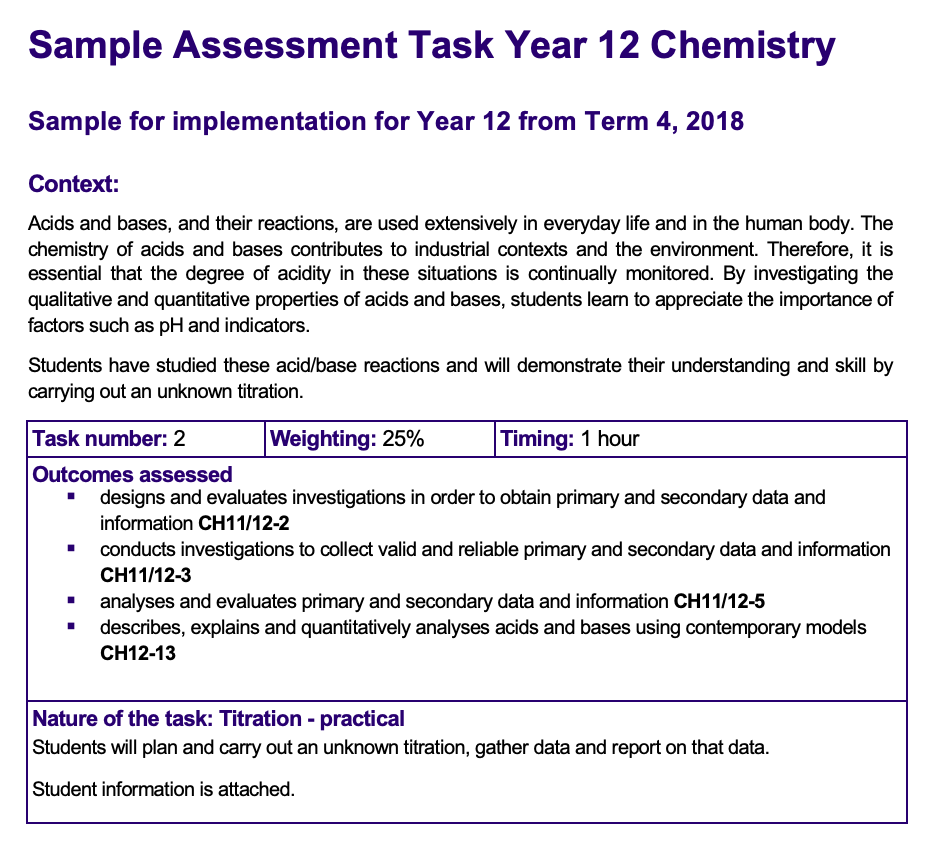
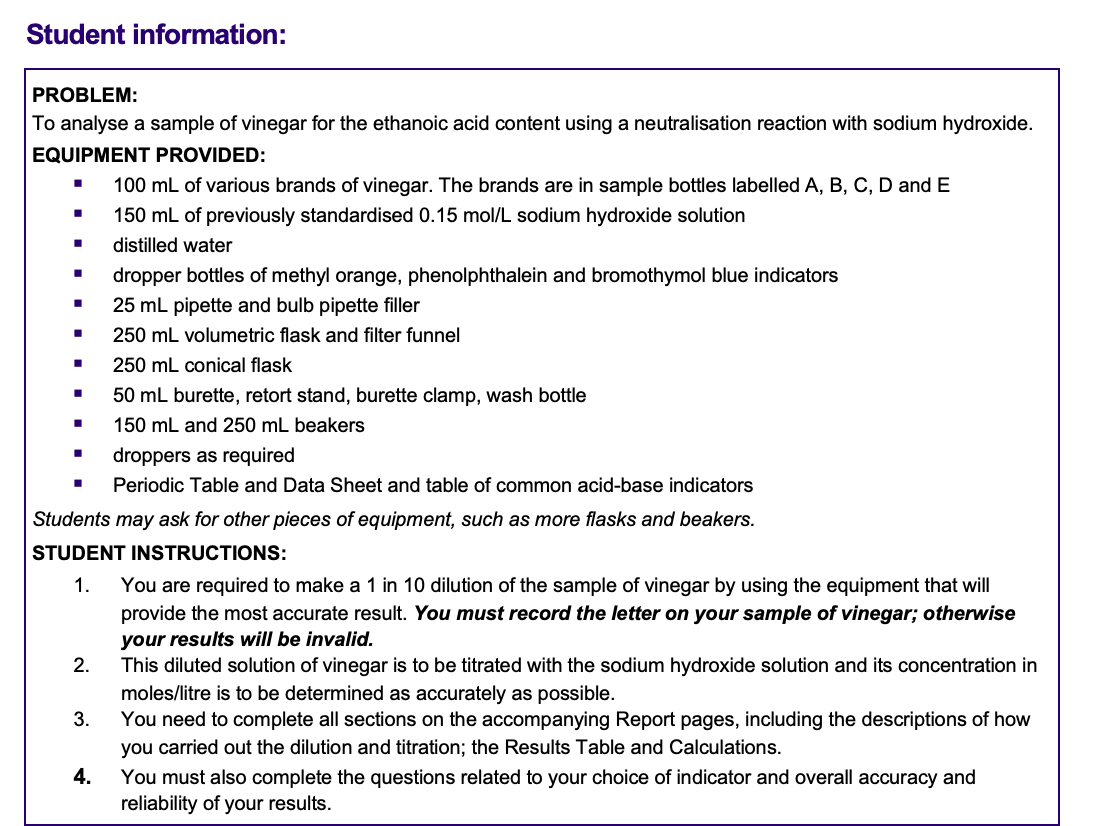
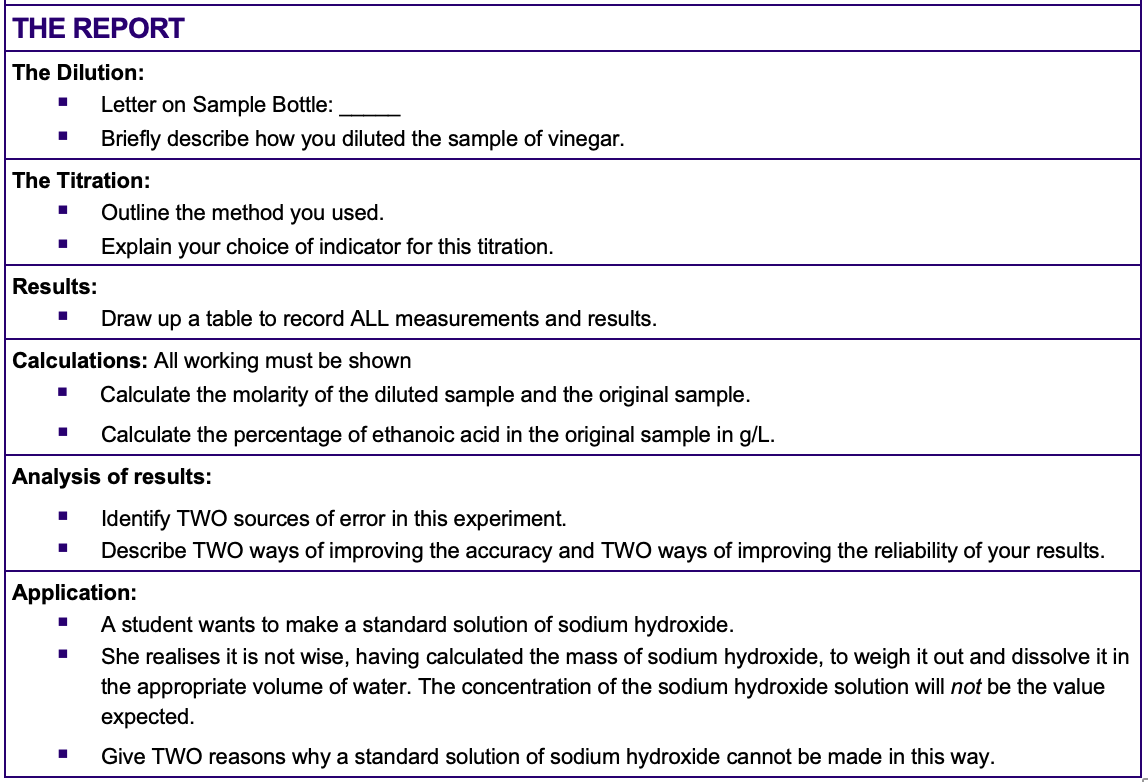
Chemistry Practical Exam Sample Assessment
If you are unsure how the exam could be structured, here is a sample assessment from NESA.
In this assessment, you are tasked to conduct a titration experiment and calculate the concentration of your vinegar using a NAOH primary standard. You are then required to analyse your experiment with short answer discussion questions.
- Remember NAOH is not a good primary standard, it absorbs moisture from the air making it more dense then you measured, hence reducing the validity of your experiment.
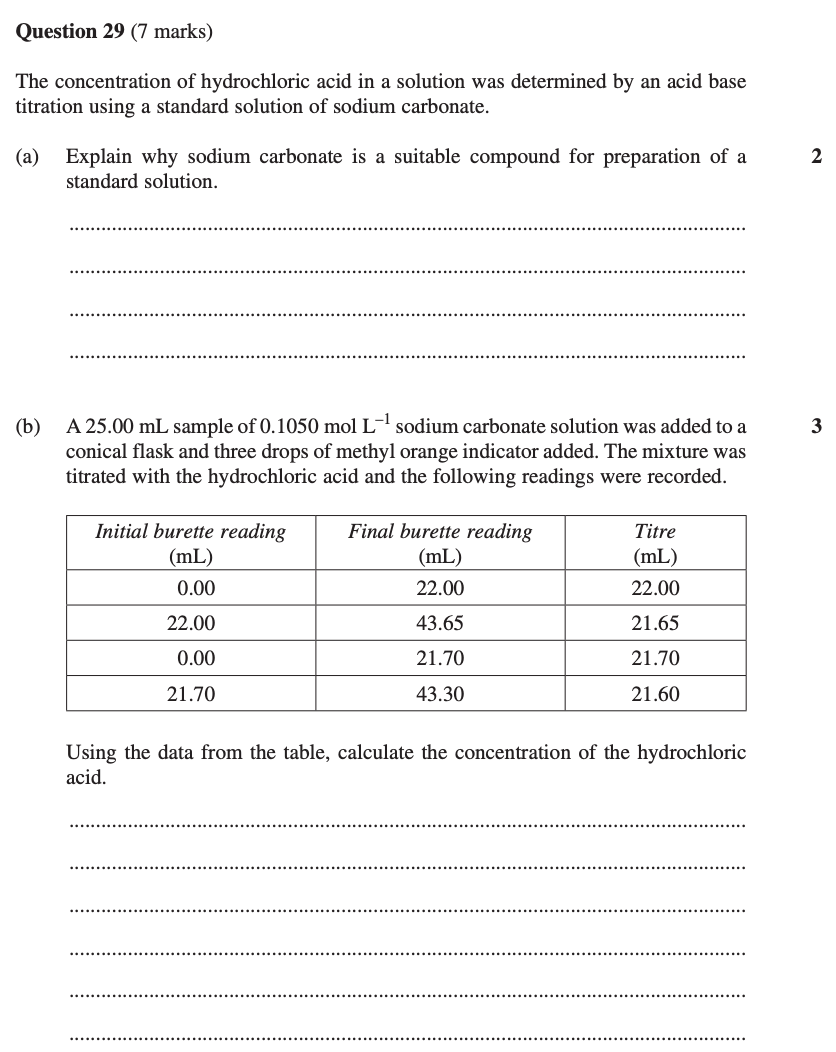
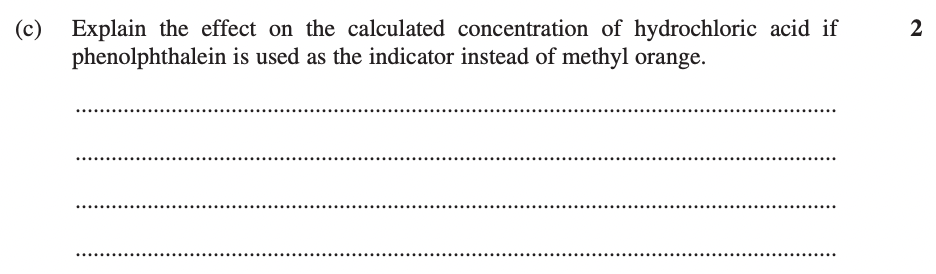
Practice Question
Let's have a practice of your titration calculation and analysis with this past 2018 HSC question.
 KIS Academics
Final tips
- Remember to wash the burette and pipette with solutions they are filled with (you only need a few mL). Everything else gets washed only in distilled water.
- Ensure you know the reasons for rinsing each piece of equipment,
- Read from the bottom of the meniscus at eye level.
- Drain the pipette by holding against the side of your conical flask, tap once when finished. DO NOT shake for last few drops.
- Do a rapid titration first - this will allow you to do other titrations faster.
- Omit outliers from your calculations.
KIS Academics
Want more personalized study guidance to help drastically improve your marks? A private tutor can make the biggest difference!


