


Got an HSC Chemistry practical assessment coming up and have no idea what your teacher might throw at you?
Titration is one of the biggest practical skills to master, especially for Module 6: Acid/Base Reactions. NESA even provides schools with a sample Year 12 practical assessment based on conducting an unknown titration. However, that does not mean every school has to give you the same titration task.
This guide covers exactly what you should revise for an HSC Chemistry practical exam, with a detailed titration walkthrough plus other Module 5–8 practical skills you should be ready for.
🌟 KIS Summary 🌟
If your practical is tomorrow, focus on these five things:
- Know titration technique properly, including why each piece of glassware is rinsed differently.
- Practise titration calculations without relying on a memorised sequence.
- Know the difference between accuracy, reliability, validity and precision.
- For every practical you have completed in class, revise the aim, method, Chemistry, expected results, errors and improvements.
- Be prepared to explain why a method is used, not merely describe what you did.
 Manoj Arachige
What Can Be Tested in an HSC Chemistry Practical Exam?
There isn't one universal HSC Chemistry practical exam completed by every NSW student.
NESA provides sample assessment tasks, including a Year 12 Module 6 Practical Task based on titration, but individual schools develop their own assessment programs within NESA requirements.
This means your teacher might give you:
A known practical - You repeat an experiment already completed in class.
A modified practical - You recognise the underlying Chemistry, but one variable, chemical or piece of equipment changes.
An unfamiliar investigation - You are given equipment and instructions and need to apply your Working Scientifically skills.
Practical + written questions - You conduct the experiment and then answer calculations, analysis and evaluation questions.
This last format is particularly important to prepare for. You shouldn't only know how to physically perform an experiment.
You should know why each step matters.
What HSC Chemistry Practicals Should You Revise?
The NSW Department of Education currently provides Year 12 teaching resources specifically covering Module 5 solution equilibria, Module 6 acid-base analysis, Module 7 organic chemistry and Module 8 analysis of substances and spectral data.
Your school may use different experiments, but these give you a useful idea of the types of practical and analytical skills associated with each module.
Module 5: Equilibrium and Acid Reactions
Be prepared for investigations involving areas such as:
- reversible reactions
- equilibrium systems
- Le Chatelier's principle
- changing concentration or temperature
- solubility equilibria
- precipitation
- equilibrium calculations.
For example, you might observe how an equilibrium system responds when a reactant is added and then explain the shift using Le Chatelier's principle.
Don't stop at: The equilibrium shifted to the right.
You should be able to explain: Adding a reactant disturbs the equilibrium. The system responds in the direction that consumes some of the added reactant, establishing a new equilibrium position.
If there is a visible colour change or precipitate, connect the macroscopic observation to the chemical species responsible.
Module 6: Acid/Base Reactions
This is where acid-base titration becomes particularly important.
Other skills could include:
- measuring pH
- interpreting titration curves
- selecting indicators
- preparing standard solutions
- dilution
- using volumetric glassware
- acid-base calculations
- investigating buffers.
NESA specifically publishes a sample Year 12 practical task for Module 6 based on titration. For that reason, we're going to cover titration in detail below.
Module 7: Organic Chemistry
Don't assume a practical exam has to involve acids and bases.
Module 7 practical work may involve:
- properties of organic compounds
- reactions of functional groups
- organic synthesis
- esterification
- comparing physical properties
- purification or separation techniques
- observations from organic reactions.
The Department of Education provides dedicated Module 7 organic chemistry resources as part of its current Stage 6 Chemistry support materials.
If you've completed an organic synthesis in class, revise:
reactants → reaction conditions → product → observations → purification → yield → limitations
You could also be asked why a particular method or piece of equipment is used.
Module 8: Applying Chemical Ideas
Module 8 is heavily focused on chemical analysis.
You should be prepared to work with:
- qualitative analysis
- identifying unknown substances
- precipitation reactions
- analytical data
- calibration data
- spectroscopy
- spectra
- quantitative analysis
- comparing analytical techniques.
The NSW Department of Education provides specific Module 8 resources for the analysis of organic substances and sample spectral data, highlighting the importance of interpreting analytical evidence in this part of the course.
You may therefore face a practical-style assessment where some of the "experiment" is actually interpreting data produced by analytical equipment.
HSC Chemistry Titration Practical: Complete Guide
What Is Titration?
Titration is a type of volumetric analysis used to determine the concentration or amount of a substance by reacting it with another solution whose concentration is known.
A common HSC setup is: known concentration → titrant
reacts with unknown concentration → analyte
Once you know the volume required for complete reaction, you can use stoichiometry to determine the unknown concentration.
Step 1: Understand Primary Standards
This is frequently misunderstood.
A primary standard is a highly pure, stable substance that can be accurately weighed to prepare a solution of known concentration.
A good primary standard should generally have characteristics such as:
- high purity
- chemical stability
- known composition
- minimal reaction with air
- minimal absorption of moisture
- reasonable solubility
- sufficiently high molar mass to reduce the relative effect of weighing uncertainty.
Is NaOH a primary standard?
No. This is an important HSC Chemistry point.
Sodium hydroxide absorbs moisture and reacts with carbon dioxide from the atmosphere. Consequently, weighing out what appears to be a particular mass of NaOH does not allow you to confidently determine the amount of pure NaOH present.
In NESA's sample titration task, the NaOH solution is previously standardised before students use it to determine the concentration of ethanoic acid in vinegar. The sample task specifically expects students to understand why NaOH cannot simply be prepared directly as a primary-standard solution.
Don't confuse:
Primary standard
A substance suitable for directly preparing a highly accurate standard solution.
with:
Standard solution
Any solution whose concentration is accurately known.
A NaOH solution can therefore become a standard solution after standardisation without NaOH itself being a suitable primary standard.
Step 2: Preparing a Primary Standard Solution
If your assessment asks you to prepare a standard solution from a primary standard, know the logic of the process rather than blindly memorising steps.
A typical process is:
- Calculate the required amount of primary standard.
- Accurately weigh the required mass.
- Quantitatively transfer the substance into a volumetric flask.
- Rinse any remaining material into the flask with distilled/deionised water.
- Add water and dissolve the solute completely.
- Add distilled water until close to the calibration line.
- Add the final water carefully until the bottom of the meniscus reaches the calibration line at eye level.
- Stopper the flask.
- Invert the flask repeatedly to produce a homogeneous solution.
Why use a volumetric flask?
Because it is designed to contain a specific, accurately known volume.
Using a beaker or measuring cylinder would generally give a less accurate volume measurement.
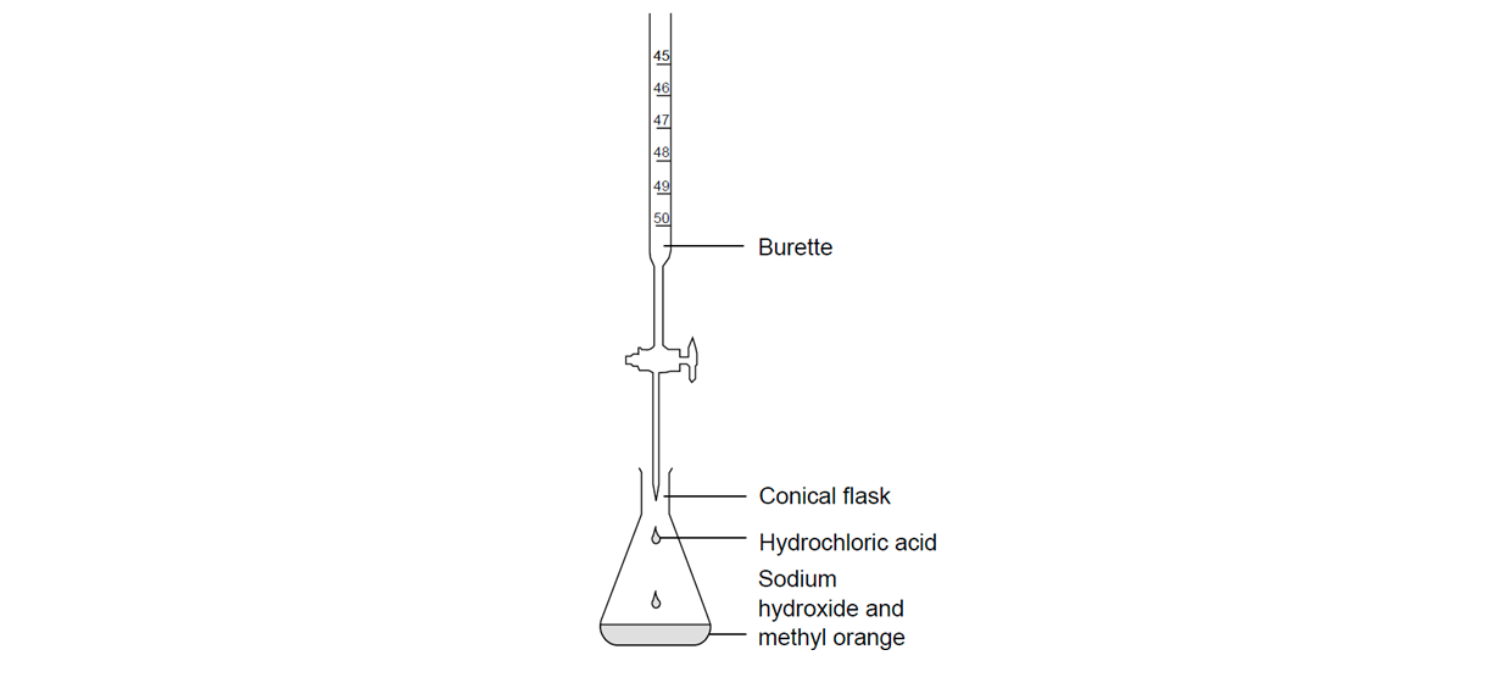
Step 3: Preparing the Burette
The burette contains your titrant.
Before titrating:
- Rinse the burette with distilled water if necessary.
- Rinse it with a small quantity of the titrant.
- Allow some titrant to run through the tip.
- Fill the burette.
- Ensure there are no air bubbles in the tip.
- Remove the filling funnel.
- Record the initial burette reading at eye level.
Why rinse the burette with titrant?
Because any distilled water remaining inside would dilute the titrant, changing its concentration.
This could introduce a systematic error. This question comes up constantly in practical assessments:
Why is the burette rinsed with the solution it will contain?
Know the reasoning, not just the rule.
Step 4: Preparing the Pipette
The pipette transfers an accurately measured aliquot of solution into the conical flask.
A volumetric pipette should normally be rinsed with the solution it is going to transfer.
Why?
If distilled water remains in the pipette, it can dilute the solution before the aliquot has been measured, meaning fewer moles may be transferred than expected.
Use a pipette filler rather than pipetting by mouth. Allow a volumetric pipette to drain as intended. Do not blow the final residual drop out unless the equipment is specifically designed for that use.
Step 5: Preparing the Conical Flask
Transfer your measured aliquot into the conical flask. Then add a small amount of the appropriate indicator.
Importantly:
Why can the conical flask be rinsed with distilled water?
Because adding distilled water changes the concentration and total volume inside the flask, but it does not change the number of moles of analyte already transferred by the pipette.
The stoichiometric amount of titrant required to react with those moles therefore remains unchanged. This is one of the most useful titration explanations to know.
Step 6: Choosing the Correct Indicator
Equivalence Point - The point where stoichiometrically equivalent quantities of acid and base have reacted. In simple terms, the equivalence point is when exactly enough moles of titrant have been added to react with all of the titrant.
Endpoint - The observable point where the indicator changes colour.
A suitable indicator should change colour within the steep region of the titration curve surrounding the equivalence point.
Don't simply memorise: pH 7 = bromothymol blue.
The actual principle is: Does the indicator transition range lie within the rapid pH change around the equivalence point?
As a useful HSC guide:
| Titration | Equivalence Region | Common Suitable Indicator |
|---|---|---|
| Strong acid + strong base | Around neutral | Several indicators may work because the pH change is very steep; bromothymol blue is suitable |
| Strong acid + weak base | Acidic | An indicator that changes colour in the acidic region, such as methyl orange |
| Weak acid + strong base | Basic | Phenolphthalein |
| Weak acid + weak base | No sharp pH change | A visual indicator is generally unsuitable; an instrumental method such as a pH probe may be preferable |
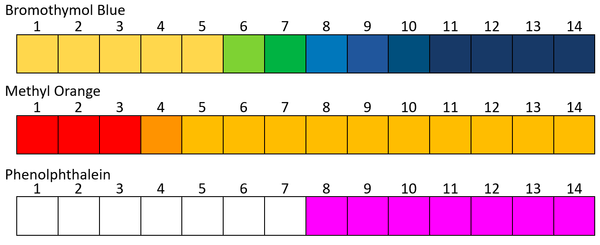
The important exam skill is being able to justify your choice from the titration curve, rather than memorising an indicator table with no reasoning.
Step 7: Conducting the Titration
A good practical sequence is:
- Record the initial burette reading.
- Add titrant to the conical flask while continuously swirling.
- As you approach the endpoint, slow the addition to individual drops.
- Rinse any splashes down the inside wall of the conical flask with distilled water if necessary.
- Stop when the indicator reaches the required permanent colour change.
- Record the final burette reading.
- Calculate the titre.
- Repeat until you obtain sufficiently consistent results.
A rough titration can help you estimate where the endpoint occurs.
You can then approach that region more carefully during subsequent titrations.
How to Do HSC Chemistry Titration Calculations
A reliable calculation process is:
balanced equation → moles of known solution → mole ratio → moles of unknown → concentration → account for dilution
Example Calculation Question
Suppose:
- 25.00 mL of unknown HCl is placed in the flask
- NaOH concentration = 0.1000 mol L⁻¹
- average NaOH titre = 20.40 mL.
Reaction: HCl + NaOH → NaCl + H₂O
Step 1: Calculate moles of NaOH
Use: n = cV
Remember to convert mL to L.
n(NaOH)
= 0.1000 × 0.02040
= 0.002040 mol
Step 2: Use the mole ratio
HCl : NaOH = 1 : 1
Therefore: n(HCl) = 0.002040 mol
Step 3: Calculate HCl concentration
c = n/V
c(HCl)
= 0.002040 / 0.02500
= 0.08160 mol L⁻¹
If the original sample was diluted before titration, you would then need to account for the dilution factor to determine its original concentration.
Biggest calculation mistake
Students often jump immediately to:
c₁V₁ = c₂V₂
That only works directly when the relevant stoichiometric relationship allows it.
The safer approach is always:
calculate moles → use the balanced equation → calculate unknown concentration.
Titration Equipment: What Gets Rinsed With What?
A practical exam can easily ask you to explain why one piece of equipment is rinsed differently from another so this is worth memorising with the reason.
| Equipment | Rinse With | Why? |
|---|---|---|
| Burette | Titrant | Prevents residual water from diluting the titrant and changing its concentration |
| Pipette | Solution being transferred | Prevents residual water from diluting the solution before the measured aliquot is delivered |
| Conical flask | Distilled/deionised water | Additional water changes the volume but does not change the moles of analyte already transferred |
| Volumetric flask | Distilled/deionised water | Any residual distilled water simply forms part of the solvent used to make the solution up to the accurately defined final volume |
Common HSC Titration Errors
This section is particularly important because many practical assessments combine the experiment with written evaluation questions.
Overshooting the Endpoint
If you add too much titrant, your recorded titre becomes too large. This can produce a systematic overestimate or underestimate in the final calculated concentration depending on which solution is unknown. Know how to explain which measured value changes and what that does to the calculation.
Parallax Error
Reading the burette from above or below eye level can change the recorded volume. To improve read the bottom of the meniscus at eye level.
Air Bubble in the Burette Tip
Suppose the burette tip initially contains air. Some apparent delivered volume may first fill the tip rather than enter the conical flask. Your recorded titre can therefore differ from the amount actually delivered to the analyte. To improve run titrant through the burette tip before recording the initial reading and check for air bubbles.
Rinsing the Burette Only With Water
Residual water dilutes the titrant. To improve condition the burette with a small volume of titrant before filling.
Rinsing the Conical Flask With Analyte
If you rinse the flask with analyte and that additional solution remains inside, you add unknown extra moles of analyte. The titre will therefore no longer correspond only to the accurately measured pipette aliquot. Use distilled/deionised water instead.
Using Too Much Indicator
Indicator itself participates in acid-base chemistry. Only a small amount should normally be required to observe the endpoint. Using excessive indicator can slightly affect the titration and make the endpoint harder to judge.
Reliability vs Validity vs Accuracy in Chemistry Practicals
You should be able to evaluate all three without resorting to generic definitions.
Reliability
Are repeated measurements consistent?
In titration, evidence of reliability could include:
- concordant titres
- repeated trials
- a small spread between repeated measurements.
The final titres were closely grouped, indicating that repeated measurements produced consistent results and therefore supporting the reliability of the mean titre.
Accuracy
How close is your result to the true or accepted value?
Accuracy may be improved by:
- calibrated equipment
- appropriate volumetric glassware
- careful meniscus readings
- suitable indicator selection
- appropriately standardised solutions
- minimising systematic errors.
Validity
Does the investigation actually answer the intended question using an appropriate method?
Validity may depend on:
- appropriate experimental design
- suitable measurement techniques
- relevant variables being controlled
- a reaction appropriate for the intended analysis
- calculations based on correct chemical assumptions.
Don't write: The experiment was valid because the equipment was accurate.
Those are different concepts.
Precision
Precision describes how closely repeated measurements agree.
A burette can also provide much finer volume measurements than a typical measuring cylinder.
Remember: precise ≠ automatically accurate.
You can repeatedly obtain nearly identical values that are all wrong because of a systematic error.
The Practical Exam Questions You Should Expect
Don't just practise physically titrating. Prepare answers to questions such as:
Why is the burette rinsed with titrant?
Because residual distilled water would dilute the titrant and alter its known concentration.
Why is the pipette rinsed with the solution being transferred?
Because residual water would dilute that solution before the aliquot is measured and delivered.
Why can the conical flask be rinsed with distilled water?
Because added water does not change the number of moles of analyte already transferred.
Why is NaOH unsuitable as a primary standard?
Because its composition cannot be maintained accurately enough through simple weighing due to interactions with atmospheric moisture and carbon dioxide.
Why is a rough titration performed?
To approximately locate the endpoint so subsequent titrations can approach it more slowly and precisely.
Why must the burette be read at eye level?
To minimise parallax error.
Why should the funnel be removed after filling the burette?
Any remaining solution dripping from the funnel could alter the burette reading after the initial volume has been recorded.
What is the difference between endpoint and equivalence point?
The equivalence point is the theoretical stoichiometric point of reaction, while the endpoint is the observable indicator colour change used to estimate it.
How can reliability be improved?
Repeat the titration and obtain consistent concordant titres.
How can accuracy be improved?
Use appropriate calibrated volumetric equipment, correct technique and an appropriate indicator while minimising systematic error.
These are exactly the kinds of questions that separate someone who memorised a titration method from someone who actually understands it.
After Your Practical: Prepare for the Written Component
Your experiment may only be half of the assessment.
You could then be asked to:
- calculate an unknown concentration
- explain an observed trend
- draw a graph
- analyse data
- identify errors
- justify equipment
- suggest improvements
- assess reliability
- assess validity
- compare your result with an accepted value
- evaluate whether the evidence supports a hypothesis.
This is why Chemistry practical preparation should always include Working Scientifically questions, not just laboratory technique.
If you want more practice applying these skills, work through the sample assessment and questions below.
Chemistry Practical Exam Sample Assessment
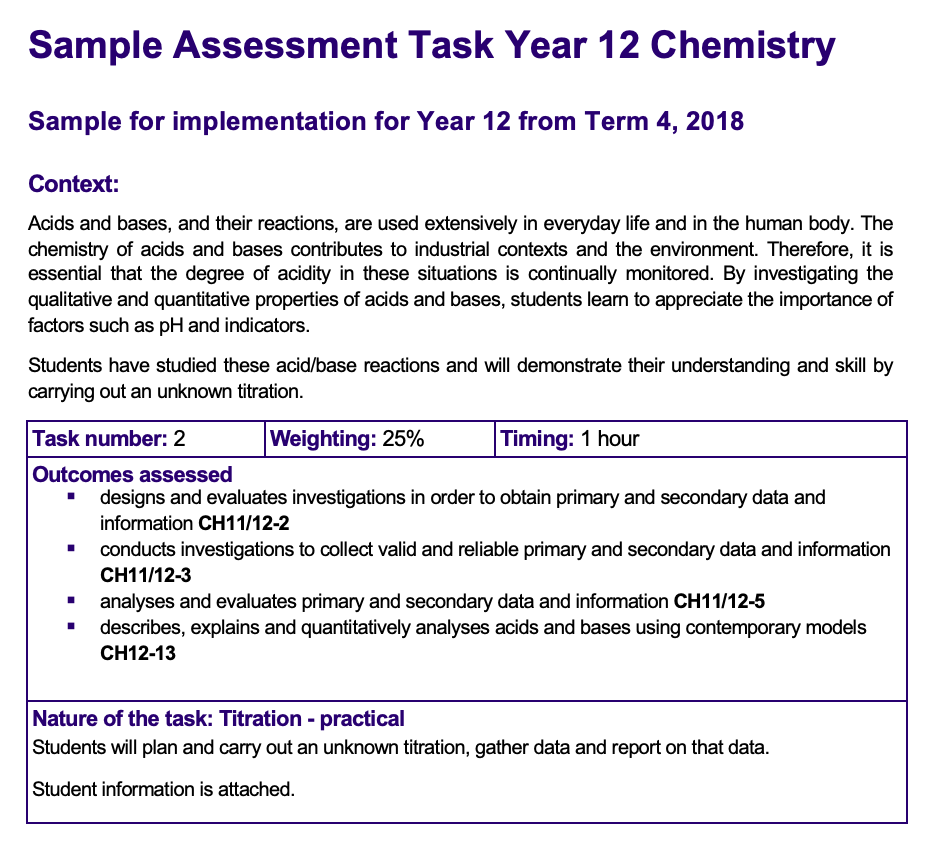
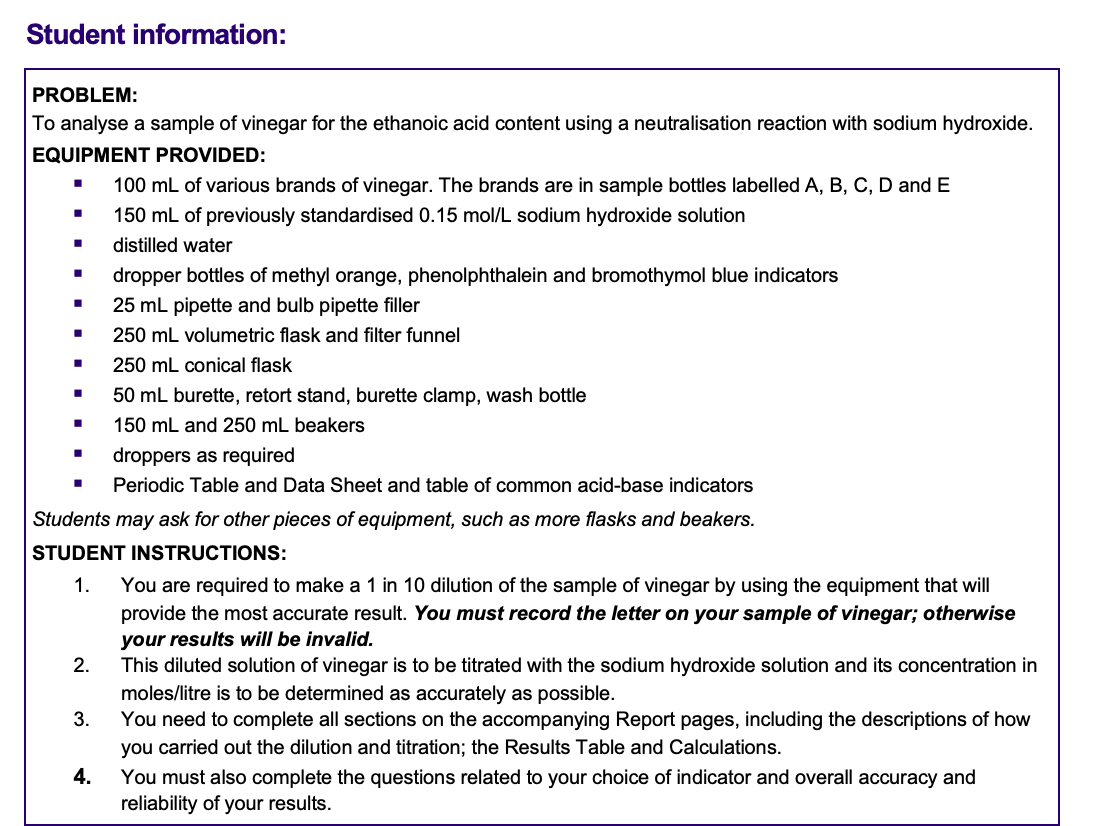
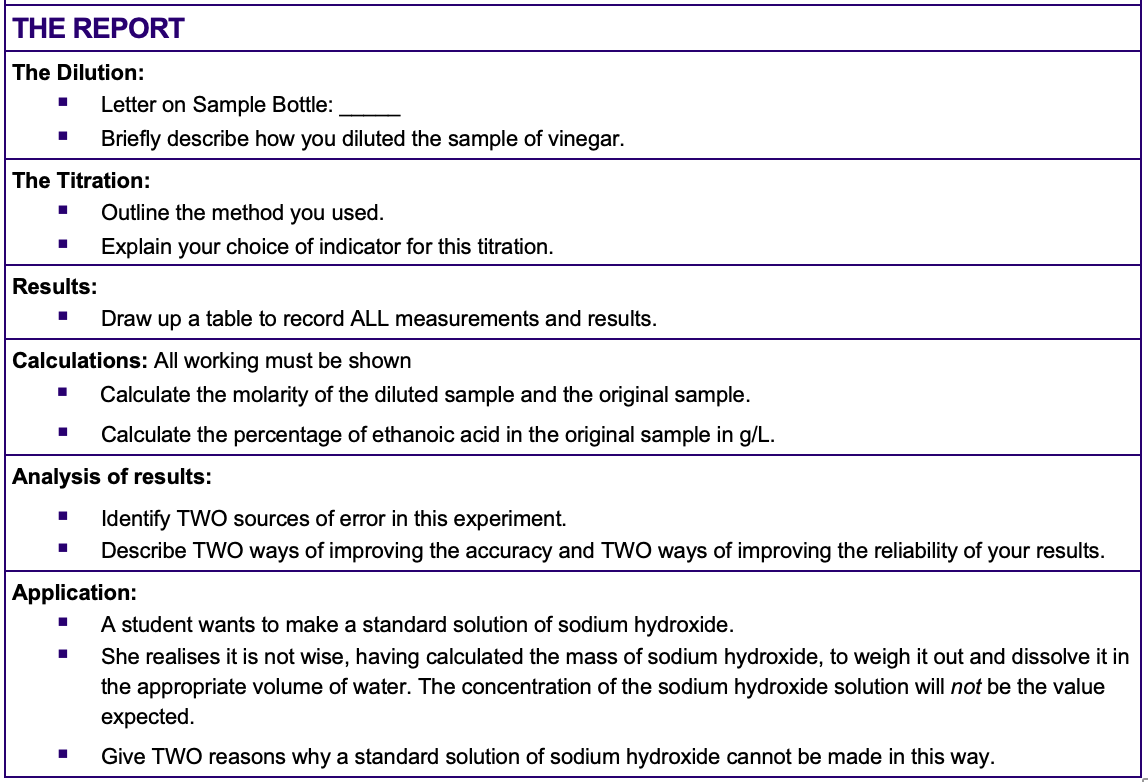
If you are unsure how the exam could be structured, here is a sample assessment from NESA.
In this assessment, you are tasked to conduct a titration experiment and calculate the concentration of your vinegar using a NAOH primary standard. You are then required to analyse your experiment with short answer discussion questions.
Remember NAOH is not a good primary standard; it absorbs moisture from the air making it more dense than you measured, hence reducing the validity of your experiment.
Practice Question
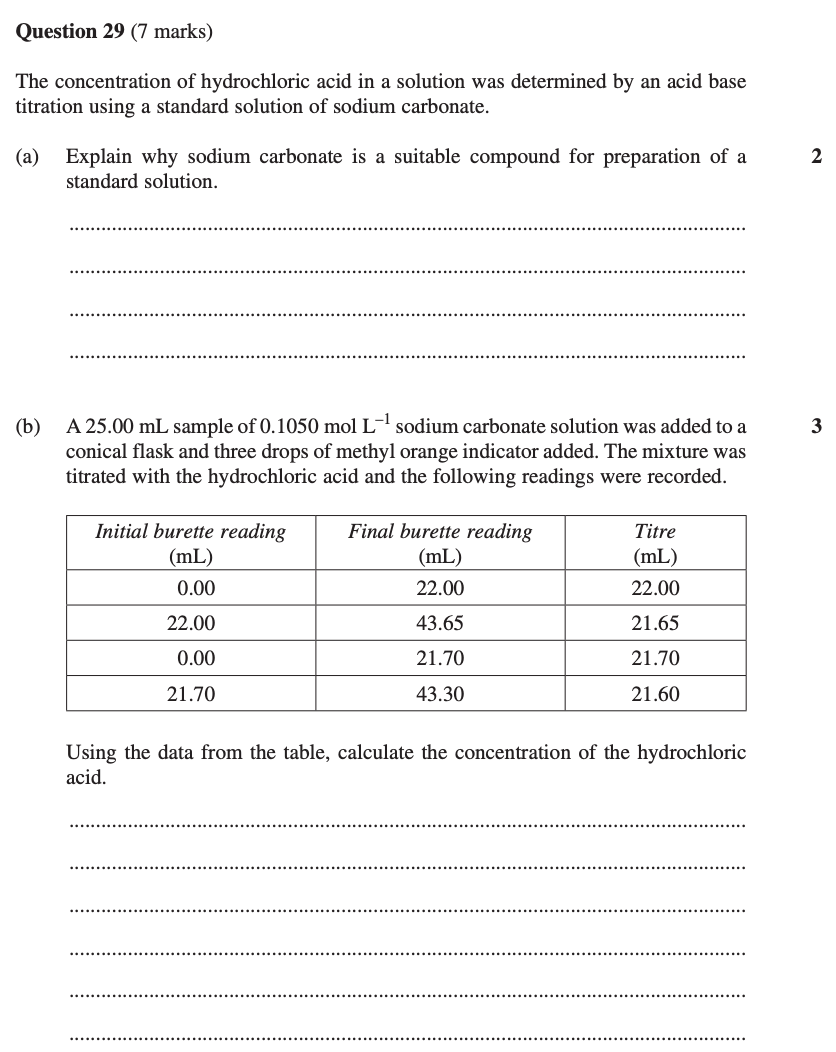
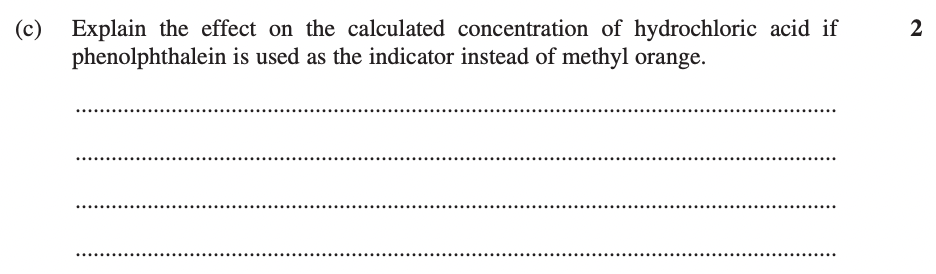
Let's have a practice of your titration calculation and analysis with this past 2018 HSC question:
HSC Chemistry Practical Exam Checklist
- I can correctly set up and use a burette.
- I know how to use a volumetric pipette and pipette filler.
- I know how to prepare a solution using a volumetric flask.
- I understand what makes a good primary standard.
- I know why NaOH is unsuitable as a primary standard.
- I understand aliquot, titre, titrant and analyte.
- I know the difference between endpoint and equivalence point.
- I can select and justify an appropriate indicator.
- I know why each piece of titration glassware is rinsed differently.
- I can calculate concentration from titration results.
- I can correctly account for dilution.
- I understand reliability.
- I understand validity.
- I understand accuracy.
- I understand precision.
- I can distinguish random and systematic errors.
- I can explain the direction an error would affect my result.
- I can suggest specific improvements instead of saying "be more careful".
- I have revised the major practicals completed in my current module.
- I can connect every practical to the Chemistry theory behind it.
- I can analyse experimental data without being told what trend to look for.
🚀 Need Help Preparing for Your HSC Chemistry Practical?
Practical assessments are difficult to cram for because you're being tested on Chemistry knowledge and scientific reasoning at the same time.
A 🌟 KIS Academics HSC Chemistry tutor can help you work through titration calculations, revise your school's practicals, practise experimental-analysis questions and identify exactly where you're losing marks before the assessment.
You should also use these KIS Chemistry resources:
HSC Chemistry: The Complete Course Guide
Use this for the wider syllabus, assessments and Band 6 study strategy.
How to Write a Band 6 HSC Chemistry Depth Study Report + Examples
Use this if your practical feeds into a Depth Study or scientific report.
HSC Chemistry Practice Papers & Solutions
Use this to practise calculations, Working Scientifically questions and HSC-style applications.
HSC Chemistry FAQs
What practicals can be tested in HSC Chemistry?
The exact assessment is determined by your school.
Across Year 12, practical and analytical skills can relate to equilibrium, acid-base chemistry, organic chemistry and chemical analysis. Current NSW Department of Education resources include solution equilibria, acid-base analysis, organic chemistry and analysis of substances/spectral data across Modules 5–8.
How do I study for an HSC Chemistry practical exam?
For each major class practical, revise:
aim → theory → method → expected results → calculations → errors → improvements → reliability/validity/accuracy.
Then practise answering unfamiliar experimental questions rather than memorising methods word-for-word.
What is the difference between accuracy, reliability and validity?
Accuracy concerns how close measurements or results are to the true or accepted value.
Reliability concerns consistency across repeated measurements.
Validity concerns whether the investigation appropriately tests what it claims to test.
They should not be used interchangeably.
Why is NaOH not a primary standard?
Sodium hydroxide is unsuitable for direct preparation of a primary-standard solution because it interacts with atmospheric moisture and carbon dioxide, meaning the amount of pure NaOH cannot be determined accurately enough simply by weighing it.
What is the difference between an endpoint and an equivalence point?
The equivalence point is the theoretical point at which reactants have combined in their stoichiometric ratio.
The endpoint is the observable colour change of the indicator used to estimate that point.
A suitable indicator has a transition range within the steep pH change surrounding the equivalence point.
Want more personalised guidance to help support you through your studies? Find a KIS Academics tutor today!
What Our Students & Parents Say
600+ Five-Star reviews across all our tutoring programs — hear why below !👇


